11. november 2021

How to create a no-reply mailbox in Microsoft 365


How to create a no-reply mailbox in Microsoft 365

No-reply email addresses are useful in many scenarios, like sending notifications from transaction systems, shipping progress information, etc. In the case of such messages, you do not expect any user feedback and most of them are generated and sent automatically.

https://www.codetwo.com/admins-blog/no-reply-mailbox-in-microsoft-365/


Oprydning i WinSxS fr PowerShell

Se diskforbrug og om clean er anbefalet :

Dism.exe /Online /Cleanup-Image /AnalyzeComponentStore


Kør clean :

Dism.exe /online /Cleanup-Image /StartComponentCleanup

27. oktober 2021

Veeam Backup for Microsoft 365 Community Edition : Exchange API permissions missing

When setting up you get : microsoft api: exchange, permissions: full_access_as_app
Similar error for Sharepoint

https://www.michev.info/Blog/Post/3180/exchange-api-permissions-missing

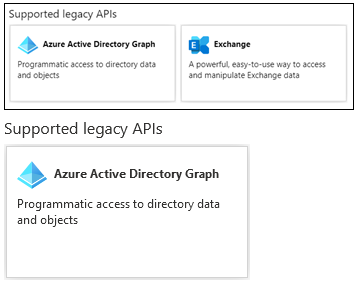
Follow the instructions up to the point where you need to add the necessary API permissions, all the earlier steps should be the same. Once you end up on the API permissions page in the Azure AD blade, you will notice that at the bottom of the Request API permissions pane you will only see a single entry under Supported Legacy APIs. Where previously you would find both Azure AD Graph API and Exchange (as depicted on the top section below), now only the former is visible (bottom):

Instead, to add the relevant permissions you now need to go back to the top of the Request API permissions pane, click the APIs my organization uses tab and search for Office 365 Exchange Online. Note that searching for just Exchange will not yield any results, as the search functionality in Azure AD blade remains quite poor.

SAME FOR SHAREPOINT (add users perm. too)


11. oktober 2021

Fjern InputIndikator (DAN) fra Windows 11

Åbn indstillinger ( Win + i )
Vælg Tid og sprog
Vælg indtastning
Vælg avancerede tastaturindstillinger
Vælg Brug værktøjslinien Sprog på skrivebordet når den er tilgængelig
Vælg indstillinger for værktøjslinien Sprog
Vælg Skjult og Anvend

31. august 2021

Redirect Guide

Redirect Guiden - Sådan laver du redirect på den rigtige måde

At lave redirect er i realiteten nemt, men at gøre det korrekt kan være sværere.Det er svært at vide hvornår man skal redirecte på en måde frem for en anden måde. 

Her i Kim Tetzlaff's indlæg, som nok er danmarks største redirect guide, viser jeg dig hvordan og hvornår det er bedst at bruge det ene frem for det andet. Forkerte redirects kan have store konsekvenser for serverens performance.

I dag kan man ikke have en hjemmeside uden at vide hvordan man laver en redirect eller hvad en redirect er, og så kan man lige så godt gøre det på den rette måde fra start, da det forkerte valg har en større indflydelse end du lige tror. De råd og tips jeg vil komme med her, henvender sig til de fleste hjemmesider på de fleste webhotelløsninger.

https://kim-tetzlaff.dk/redirect-guiden-php-vhost-htaccess.html#redirect-type

14. august 2021

How do I install the binary component for LastPass?

The binary component (i.e., Native Messaging) is included in the LastPass Universal Installer for Mac and Windows, and is supported on the Chrome, Firefox, Safari, and Opera desktop web browsers.

To check if you already have the LastPass binary component installed (and install it if it isn't already), do the following:
  1. Click the active LastPass icon  in your web browser toolbar.
  2. Go to Account Options > About LastPass.
  3. In the Binary Component section, one of the following will be listed:
    • True = installed
    • False = not installed
  4. If you wish to install the binary component, click Enable Native Messaging to install it. Once installed, you will need to restart your web browser in order for changes to take effect.


https://support.logmeininc.com/lastpass - search for How do I install the binary component for LastPass

11. marts 2021

SPF for domains der IKKE skal sende e-mail

( Se også "DKIM for domains der ikke skal sende e-mail" )

When it comes to email deliverability, most people are trying to figure out how to ensure their mail lands in the inbox. But what if you want to tell email providers that they should not accept email from a domain name? This might be the case if you have a parked domain that someone is trying to spoof when it sends email.

One option is to create a Sender Policy Framework (SPF) record that says all mail should be rejected. To do this, go to your domain name registrar and manage the DNS for the domain.

Create a TXT record and include this text:

contoso.dk TXT "v=spf1 -all"

This will tell mailbox providers that your domain name should not send any email, giving them an indication that email with your address should be considered spam.

Domain name owners should consider adding SPF records to their parked domains if they don’t use them for email.


DKIM for domains der IKKE skal sende e-mail

Identify domains that do not send email

(Se også "SPF for domains der ikke skal sende e-mail" )

Organizations should explicitly state if a domain does not send email by specifying v=DKIM1; p= in the DKIM record for those domains. This advises receiving email servers that there are no valid public keys for the domain, and any email claiming to be from that domain should be rejected. You should do this for each domain and subdomain using a wildcard DKIM.

For example, the DKIM record would look like this: (TXT record !)

*._domainkey.SubDomainThatShouldntSendMail.contoso.com. TXT "v=DKIM1; p="


MX Toolbox Supertool - DKIM


10. marts 2021

WAN IP

 Hvad er min WAN IP adresse?

Windows Defender bør fjernes fra Server 2016/2019, hvis der er anden Antivirus installeret


Kør fra Administrator CMD prompt :

Dism /online /Disable-Feature /FeatureName:Windows-Defender /Remove /NoRestart /quiet


Enable or Disable Windows Features Using DISM

https://docs.microsoft.com/en-us/windows-hardware/manufacture/desktop/enable-or-disable-windows-features-using-dism

Outlook vil ikke åbne vedhæftede filer

 Der kan også være problemer med at tilføje signatur

Tilføj til registry :


HKEY_CURRENT_USER\Software\Classes\.html.

11. februar 2021

Change Mailbox Regional Configuration from Exchage Online Powershell

Exchange online Powershell

https://supportsiden.blogspot.com/2020/06/connect-to-exchange-online-powershell.html


Get-Mailbox [username] | Get-MailboxRegionalConfiguration | Set-MailboxRegionalConfiguration -Language da-DK -DateFormat "dd-MM-yyyy" -TimeFormat "HH:mm" -TimeZone "Romance Standard Time"

Make e-mails sent from shared mailbox to be stored in shared mailbox sent folder

Exchange Online Powershell

https://supportsiden.blogspot.com/2020/06/connect-to-exchange-online-powershell.html


set-mailbox [username] -MessageCopyForSentAsEnabled $True

set-mailbox [username] -MessageCopyForSendOnBehalfEnabled $True

Kalender default rettigheder i O365

Du får nok brug for : EXO V3 module :

https://docs.microsoft.com/en-us/powershell/exchange/exchange-online-powershell-v2?view=exchange-ps#install-and-maintain-the-exo-v2-module

----------------------------------------------------------------------------

We have released new management cmdlets which are faster and more reliable.

|--------------------------------------------------------------------------|

|    Old Cmdlets                    |    New/Reliable/Faster Cmdlets       |

|--------------------------------------------------------------------------|

|    Get-CASMailbox                 |    Get-EXOCASMailbox                 |

|    Get-Mailbox                    |    Get-EXOMailbox                    |

|    Get-MailboxFolderPermission    |    Get-EXOMailboxFolderPermission    |

|    Get-MailboxFolderStatistics    |    Get-EXOMailboxFolderStatistics    |

|    Get-MailboxPermission          |    Get-EXOMailboxPermission          |

|    Get-MailboxStatistics          |    Get-EXOMailboxStatistics          |

|    Get-MobileDeviceStatistics     |    Get-EXOMobileDeviceStatistics     |

|    Get-Recipient                  |    Get-EXORecipient                  |

|    Get-RecipientPermission        |    Get-EXORecipientPermission        |

|--------------------------------------------------------------------------|

To get additional information, run: Get-Help Connect-ExchangeOnline

Please send your feedback and suggestions to exocmdletpreview@service.microsoft.com

----------------------------------------------------------------------------

Installation/opdatering/afinstallation af EXO V3

a:
Set-ExecutionPolicy RemoteSigned

b:
Import-Module ExchangeOnlineManagement; Get-Module ExchangeOnlineManagement (import og se version)

b:
Install-Module -Force -Name ExchangeOnlineManagement (install)

c:
Update-Module -Name ExchangeOnlineManagement (update)

d:
Powershell -NoProfile -Command "Uninstall-Module ExchangeOnlineManagement" (uninstall)

ELLERS : Fjern "EXO" fra kommandoer !


**Kør PowerShell som Administrator !

*** Udskift alt indenfor [] med dine data


For ALLE brugere (Reviewer):

https://community.spiceworks.com/how_to/135665-office-365-setting-default-calendar-permissions-to-reviewer-for-all-users

1:
Set-ExecutionPolicy RemoteSigned

2:
Import-Module ExchangeOnlineManagement

3:
Connect-ExchangeOnline -UserPrincipalName [admin-username@contoso.dk] -ShowProgress $true -DelegatedOrganization [organisation].onmicrosoft.com

4:
$users = Get-EXOMailbox -Resultsize Unlimited

5: 
Get-Mailbox | ForEach-Object {Get-EXOMailboxFolderPermission $_”:\Kalender”} | Where {$_.User -like “Default”} | Select Identity, User, AccessRights

6: 
ForEach ($user in $users) { Write-Host -ForegroundColor green Setting permission for $($user.alias)... Set-MailboxFolderPermission -Identity $($user.alias):\Kalender -User Default -AccessRights Reviewer }

7:
Disconnect-ExchangeOnline


For ENKELT bruger

https://thomasmitchell.net/managing-calendar-permissions-in-o365-with-powershell/

4:
Get-MailboxFolderPermission [username]:\Kalender

5:
Set-MailboxFolderPermission -Identity [username]:\Kalender -User Default -AccessRights Reviewer

6:
Disconnect-ExchangeOnline


Mulige kalenderrettigheder


Owner.   Allows read, create, modify and delete all items and folders. Also allows manage items permissions

PublishingEditor.   Allows read, create, modify and delete items/subfolders.

Editor.   Allows read, create, modify and delete items.

PublishingAuthor.   Allows read, create all items/subfolders. You can modify and delete only items you create.

Author.   Allows create and read items; edit and delete own items.

NonEditingAuthor.   Allows full read access and create items. You can delete only your own items.

Reviewer.   Read only.

Contributor.   Allows create items and folders.

AvailabilityOnly.   Allows read free/busy information from calendar

LimitedDetails.   Allows view of the subject and location.

None.   No permissions to access folder and files.